
Understanding how visitors interact with your website is a no-brainer when you’re looking to grow your website’s traffic and improve the written content across your pages. That’s where Google Analytics comes in handy — it allows you to track user behaviour, measure performance, and make data-driven decisions. Installing Google Analytics might seem daunting at first for beginner WordPress users, but there are several ways to do it depending on your comfort level.
In this guide, we’ll walk you through everything you need to know about installing Google Analytics on WordPress — why it’s important, how to get started, and the different methods available to you whether you’re a beginner or an advanced WordPress developer interested in finding alternative ways. After all, if you’re a web design agency like ours, you’ll be working with a diverse range of clients across different sectors, and some of those brands will have a very particular way of doing things.
Our breakdown will also cover how to view reports, resolve common issues, and introduce some best practices to guarantee accurate tracking. We’ll help you move the needle and get a better ROI. Websites don’t always come cheap!
This Article Will Cover:
1. Why Use Google Analytics on WordPress?
You’ve no doubt heard of it, but what is Google Analytics? Boiled down, it’s a free and powerful tool that helps website owners monitor visitor activity, evaluate marketing efforts, and optimise their content. By installing Google Analytics on your WordPress site, you can:
- Track real-time user behaviour and popular pages
- Identify top traffic sources (organic, social, referral, etc.)
- Measure bounce rate, average session duration, and conversions
- Analyse device and location data
- Understand user journeys and drop-off points
These insights have proved invaluable time after time for refining content strategy, improving SEO, and maximising user engagement. Google ain’t hal bad at what they do, even if they can suck at other things—cough cough, algorithm updates that wipe off 40% of websites off of search engine results.

2. How to Sign Up for Google Analytics
So how do you get started with Google Analytics then? Before you can install Google Analytics on your WordPress site, you need to create a Google Analytics account and set up a property for your website. Here’s how to get started:
- Create a Google Account: If you don’t already have one, visit accounts.google.com to create a free Google Account. This will give you access to all Google services, including Analytics.
- Sign up for Google Analytics: Go to analytics.google.com and click “Start measuring”. Log in with your Google Account.
- Create an Account: In the Admin section of the Google Analytics dashboard, click “Create Account”. Give your account a descriptive name — this can be your business or website name.
- Set Up a Property: Next, you’ll create a property within the account. Click “Create Property”, and enter your website’s name, URL, and select the appropriate industry and time zone. This ensures that all data collected aligns with your local settings.
- Choose a Property Type: Google Analytics now uses Google Analytics 4 (GA4) by default. Confirm you’re setting up a GA4 property, which allows advanced tracking features and improved reporting.
- Create a Data Stream: Once the property is created, click on “Data Streams” in the property settings. Then click “Add Stream” and select Web as the platform. Enter your website URL and stream name, then click Create Stream.
- Copy the Measurement ID: You’ll be provided with a Measurement ID (e.g. G-XXXXXXXXXX). This is the unique identifier used to connect your site to Google Analytics. Copy this ID — you’ll use it when installing Analytics on your WordPress site.
- Install the Tracking Code: To activate tracking, you need to add the Measurement ID or full GA4 tracking script to your website. This can be done via:
- A plugin like MonsterInsights or WPCode
- Manually inserting the script into your site’s <head> section
- Using Google Tag Manager to handle the script for you
Once this is complete, Google Analytics will begin collecting data from your WordPress site, usually within 24–48 hours. So don’t panic if you don’t see anything happening to begin with. If in doubt, and as an experinced London WordPress agency, our team can help. Just get in touch.
3. Methods to Install Google Analytics on WordPress
There are three well trodden paths to take when you are looking to install Google Analytics on your WordPress site: a. using a plugin, b. manually editing theme files, or using c. Google Tag Manager.
You’ll get the same results whichever one you pick but choosing the method that best suits your experience level and website needs is best. You may want to have complete control over these settings rather than relying on a WordPress developer to pick up the slack whenever a change us needed.
A. Using a Plugin (Recommended for Beginners)
This is by far the easiest way, if you’re WordPress theme doesn’t have site wide settings to do this baked in. A plugin is easy to install and will give you instant control over installing Google Analytics.
Be careful though, you don’t want to install a plugin, add the tracking code in that plugin, only to realise your site is already tracking it elsewhere. You’ll get skewed results, so it’s always best to check you haven’t got Google Analytics already installed.

1. MonsterInsights
MonsterInsights is one of the most popular Google Analytics plugins for WordPress. It simplifies the process and displays key metrics right inside your dashboard.
Steps:
- Go to Plugins > Add New in your WordPress dashboard.
- Search for MonsterInsights and install the free version.
- Activate the plugin and run the setup wizard.
- Connect your Google Analytics account and paste your Measurement ID.
Pros:
- Beginner-friendly
- No need to touch code
- Dashboard reports and enhanced tracking features

2. WPCode (Insert Headers & Footers)
WPCode (formerly Insert Headers and Footers) allows you to insert custom scripts, like your GA4 tag, into your site without editing theme files.
Steps:
- Install and activate WPCode from the plugin repository.
- Navigate to Code Snippets > Header & Footer.
- Paste your Google Analytics tracking script in the Header section.
- Save changes. Google Analytics will now track your site traffic.
Pros:
- Lightweight and non-intrusive
- Easy to manage multiple scripts
3. Code Snippets Plugin
Code Snippets is a plugin that lets you add small bits of code to your site without editing theme files directly. It provides a safe and organised way to manage scripts.
Steps:
- Install and activate Code Snippets from the plugin repository.
- Go to Snippets > Add New.
- Name your snippet, paste your GA4 tracking code, and set the snippet to run on the frontend.
- Save and activate.
Pros:
- Keeps tracking code separate from theme files
- Allows code management in a clean interface

4. Header Footer Code Manager
This plugin gives you precise control over script placement across different pages and post types.
Steps:
- Install and activate Header Footer Code Manager.
- Go to HFCM > Add New Snippet.
- Name the snippet, select “Site Wide Header” placement, and paste your GA4 tracking code.
- Save and activate.
Pros:
- Ideal for managing multiple scripts with granular control
- Beginner-friendly interface

B. Manual Theme Insertion
This method is suitable for WordPress developers or experienced Web Design Agencies users who prefer a plugin-free setup. You’ll add the Google Analytics tracking code directly into your theme files.
Steps:
- In your WordPress dashboard, go to Appearance > Theme File Editor.
- Open header.php in your theme (preferably a child theme).
- Paste the GA4 tracking code just before the closing tag.
- Save the file.
Important:
- Use a child theme to prevent your changes from being lost during theme updates.
- Errors in this file can cause display issues, so only use this method if you’re comfortable with HTML/PHP.
Alternatively you might find your developers have created a ‘Theme Settings’ area where you can embed the code safely without messing with theme files or plugins. At Fhoke, we do exactly that.
C. Using Google Tag Manager
Google Tag Manager (GTM) is a tag management system that allows you to deploy and manage tracking scripts without editing code on your site.
Steps:
- Visit tagmanager.google.com and create a free account.
- Set up a container for your website and copy the GTM code snippet.
- Add the GTM code to your site (use WPCode or edit header.php).
- In GTM, create a Google Analytics 4 tag, assign your Measurement ID, and set a trigger for All Pages.
- Submit and publish your container.
Pros:
- Centralised script management
- Advanced tracking capabilities
- Ideal for marketers and developers
Cons:
- Slightly more complex to set up
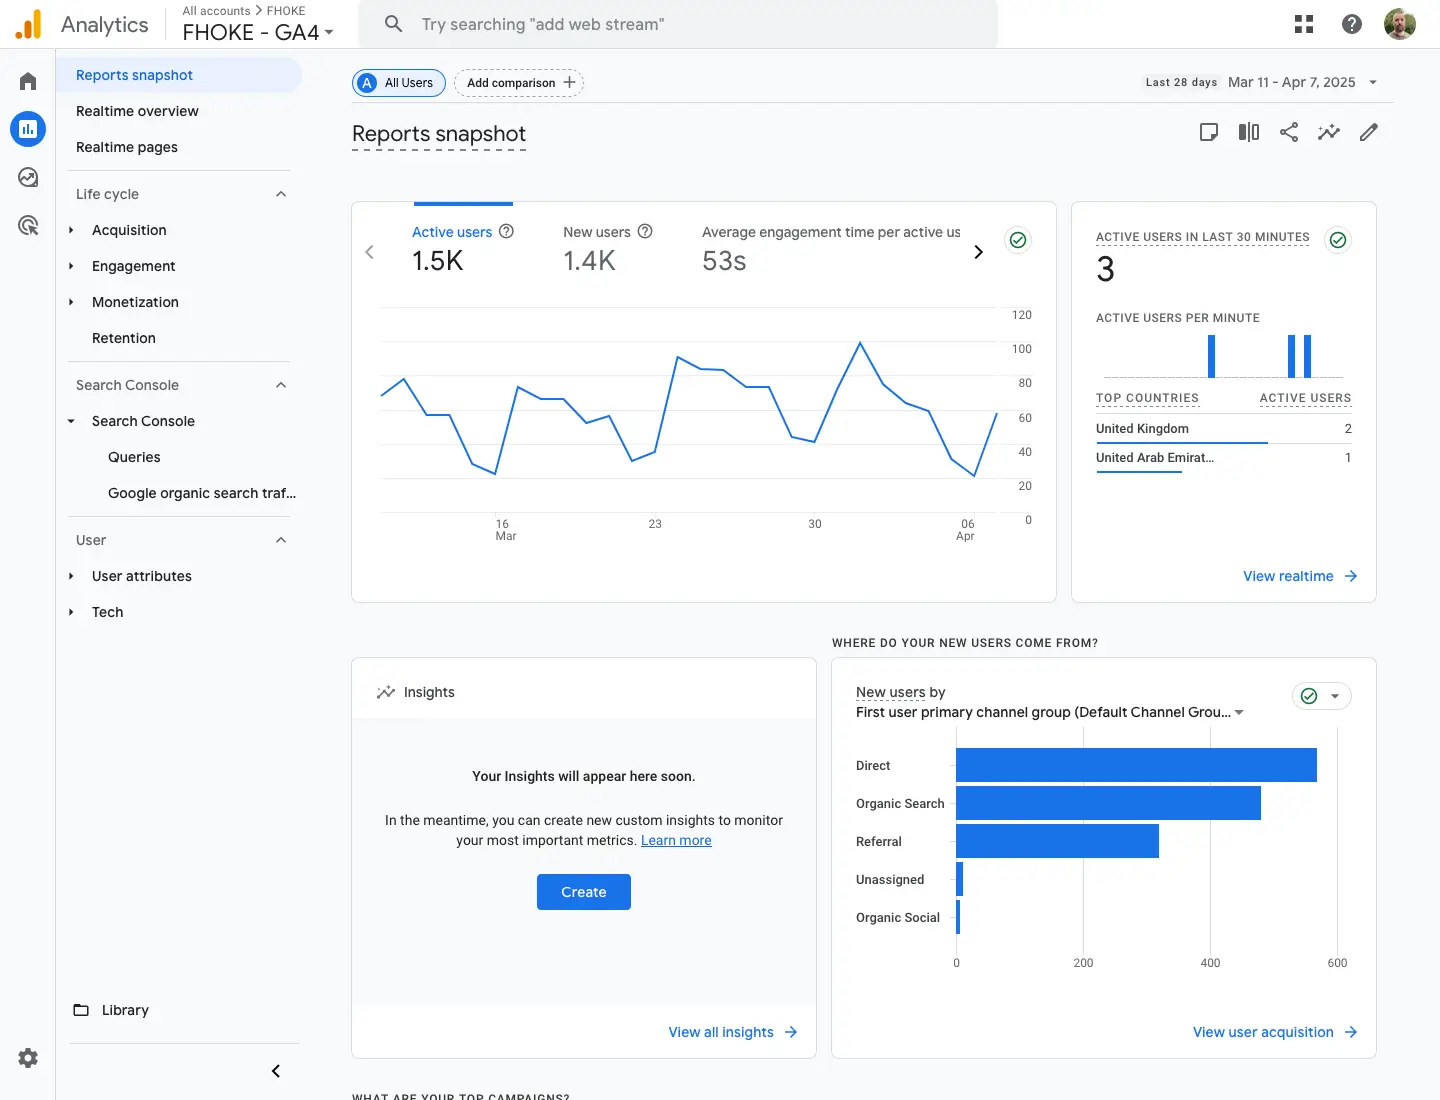
4. How to View Google Analytics Reports
Once your GA tracking is installed, you can begin viewing reports although how to use GA is a rabbit hole all of its own. It really depends what you’re trying to achieve, what your objective is for measurement, and there is often more than one way to obtain the data you’re after.
For a basic understanding of what your site is doing however you can follow the steps below. These will get you going:
- Log into your Google Analytics dashboard.
- Use the Reports section to explore:
- Realtime data
- Traffic acquisition
- Engagement metrics (pages, bounce rate, session duration)
- Demographics and device types
If you’re using MonsterInsights, basic report summaries will also appear inside your WordPress dashboard under Insights > Reports. And if you opt for the Pro version of the plugin you’ll get detailed reporting that’s friendlier to use than Google’s own Analytics dashboard.
5. Common Setup Issues & Troubleshooting Tips
Setting up Google Analytics 4 doesn’t always go smoothly. If you’re not seeing data, or encountering unexpected issues, you’re not alone. Below are some of the most common setup problems users face, along with quick, actionable tips to resolve them:
- No data in Analytics: Check that the tracking code or plugin is correctly installed.
- Wrong Measurement ID: Confirm your GA4 ID is correct.
- Caching or CDN delays: Clear your site and browser cache.
- Plugin conflicts: Deactivate other plugins to identify clashes.
- Blocked scripts: Some privacy or cookie settings can prevent GA scripts from loading.
Use can also use tools like Google Tag Assistant, GA4 DebugView, or Chrome Developer Tools to check your tracking is active.
6. Best Practices for Using Google Analytics in WordPress
To make the most of Google Analytics on your WordPress site, it’s important to go beyond installation and focus on ongoing optimisation. Proper setup and maintenance will keep your data as accurate as it can be, your reporting remain useful, and your website compliant with privacy regulations.
Whether you’re using a plugin, manual code, or Tag Manager, these best practices will help you maintain a reliable and effective tracking setup.
- Always test after installation to check your setup is tracking correctly. Use a staging site if you want when inserting code manually to preserve changes during theme updates.
- Set up goals and events in GA4 to track key interactions like form submissions, downloads, and clicks, helping you measure the success of your content and calls to action.
- Consider using Google Tag Manager if you’re managing multiple tracking codes or want to enable more advanced user behaviour tracking.
- Monitor your reports regularly to identify traffic trends, high-performing pages, and areas for improvement.
- It’s also important to respect privacy regulations. Make sure your use of Google Analytics complies with GDPR and cookie consent requirements, particularly if you collect data from users in the UK or EU. Tools like CookieYes or Complianz can help manage user consent.
- Finally, and like we already touched on, make sure your tracking code is added only once — duplicate codes can result in skewed data. Periodically review your analytics configuration and tagging setup to keep your reports clean, relevant, and actionable.
What Next?
Installing Google Analytics on your WordPress website is one of the most important steps you can take to understand your audience and grow your online presence. Whether you choose to use a plugin, add the tracking code manually, or work with Google Tag Manager, there’s a method suitable for every skill level.
By following our guide, you’ll not only have Google Analytics set up correctly, and in next to no time, but you’ll also be well on your way to making smarter, data-driven decisions to improve your website’s performance. Go get them!


